
Where AI fits in my design process
AI is starting to change many creative fields, and interior design is part of that shift. It is still early, and the tools do not yet fit together perfectly, but new possibilities are opening up through AI rendering, 3D model generation, and LLM-assisted design.
I have been experimenting with this in my own work. The useful part, for me, is being able to test shape, proportions, composition, and visual direction much earlier in the process. In this post, I'll walk through the workflow I'm using now.
Why editable geometry matters
The first version of an interior idea is almost never the final one. A cabinet changes, an island moves, a material shifts, and each decision affects the next one. So the useful tool is not just the one that makes a nice image. It is the one that gives me something I can keep changing.
That matters later, when I use AI image tools. If I ask for a render from text alone, or keep editing the render itself, the image can drift: a proportion changes, an old option comes back, or something looks beautiful but would not really work in the room. Starting from an editable 3D model makes it easier to keep those decisions in place.
With Prompt2CAD, I describe the piece I need in plain words and get a parametric 3D model I can open, edit, place in the room, and keep developing.
Quick bit of context: I'm an interior designer in Lisbon, specialising in functional residential interiors and renovations guided by sustainable practices.
Step 1
It still starts in 2D
Every project still starts with the measured 2D floor plan. I draw the existing space in AutoCAD, then test layout options on top of it.
This is where the first decisions happen. Some layouts fail immediately because they make the room too tight: the main traffic flow gets squeezed, a passage becomes awkward, or the distances between pieces are not practical.
Then the layout still has to work in 3D. Lines on a plan do not tell you how a tall cabinet feels, how heavy an island is, or whether a wall of storage makes the room feel smaller. That used to be the hard part. With AI CAD tools, it is easier to turn those options into quick 3D studies, compare what works best, and keep refining the design.
Prompt2CAD can also open supported DWG and DXF floor plans directly. The measured linework stays visible as room context while the agent builds the physical 3D design; see the floor-plan-to-3D workflow.
Step 2
I use Prompt2CAD for the pieces
Once the plan is clear enough, I start modelling the pieces that matter: a cabinet, an island, a fireplace surround, a shelf system.
I needed a corner cabinet to hide a boiler. I gave it the dimensions of the corner, the size of the boiler that had to fit inside, and the practical instruction: the boiler goes inside.
I did not specify the door split. I did not explain where the boiler usually sits. It came back with one tall door and one shorter door, split at the height that made sense.
Interactive 3D
Corner cabinet parameters
Open the doors and try the cabinet controls to inspect the door split, frame, and interior shelf.
What helped was this: I can give the important constraint, and the model fills in the normal design logic around it. It adds the panels, the door proportions, the thicknesses, and the details I would otherwise have to model from scratch in SketchUp or hunt for in a component library.
With a library, I search for something close, download it, then spend time bringing it closer to what I meant. Here, I start from the piece I need.
Materials matter too. If I ask for oak, travertine, or marble, I want the model to read that way. The grain direction and the stone veining are part of how the room feels.
Generate the first version, then tune it.
The recording shows a first model being generated, then adjusted through live parameters.
In a larger project, the useful part is seeing the pieces together. For the kitchen, I could look at the long sink run, the island with the hob, the fireplace wall, the dining table, and the chairs in the same view. That made it much easier to judge the proportions and the distance between the different zones.
I already had the 2D study, so I knew the overall footprint and the distances I needed: island to kitchen run, table to bench, fireplace wall to dining area. I built the main blocks in pieces, placed them where they needed to go, and in about ten minutes I had something I could judge.
That is the empowering part. Once the kitchen is there in front of me, I do not stay stuck with the first thought. I can ask the next question. Should the island be longer? Should the dining table move? Is the fireplace wall too heavy? One visible idea creates the next one.
Interactive 3D
Kitchen working model
Inspect the sink run, island, fireplace wall, dining table, and chairs together, with enough detail to judge proportion and spacing.
Step 3
The important part is editing
Getting the first version on screen is useful. But editing it is what makes the workflow valuable.
When I ask for a change, I want the model to know exactly which part I mean. The clearest way to do that is to select it in the 3D view, then describe the change.
So I click the cabinet doors, the drawers, or the wall units, add them to the chat, and say the change: make these deeper, raise this shelf, use a darker oak, make the doors sliding.
On the boiler cabinet, I changed the hinged doors to sliding doors. In SketchUp, that would be a fiddly twenty-minute edit. Here it took about two. The hardware changed, the doors changed, and the rest of the cabinet stayed in place. I did not have to stop designing and switch into a separate manual modelling task.
The same idea applies to the kitchen. If I want another table style, I can select the table and ask for a different option while keeping the same dimensions, position, and distances around it.
That is the real difference. It is not that SketchUp cannot do it. Of course it can. The point is that I can test a change, see it in context, and decide whether it works before I move into cleanup or manual edits. By the time the piece goes into SketchUp, most of the design work is already there. I might adjust a detail or clean up the fit, but I am not modelling the whole thing from scratch.
Select the part you mean, then ask for the change.
The model updates around that selection, so you can keep refining one piece without rebuilding the whole scene.
Step 4
The full room still lives in SketchUp
Prompt2CAD does not replace my whole interior design model.
For me, Prompt2CAD is where I make the pieces. SketchUp is where I keep the room together.
The walls, openings, neighbouring rooms, existing model, and final context are still in SketchUp. I bring the Prompt2CAD pieces into that model, adjust them if needed, and keep the whole space together there.
So the workflow is not "AI does the room". It is more practical than that. AI helps me turn ideas into pieces I can see, question, change, and place in context. SketchUp keeps the larger model organised and ready for manual edits, views, and rendering.
Step 5
The render starts from a 3D view
For final presentation images, a proper render still makes sense. V-Ray, Chaos, lighting, material setup, render settings, all of that is a real craft.
But early in the project I need something else. I need a believable image quickly, while the design is still moving. For that I use AI image tools like ChatGPT Images or Nano Banana.
The trick is simple: I do not ask the image model to invent the room from text. I give it a screenshot of the 3D view.
The prompt matters too. I ask the AI renderer to preserve the perspective, the furniture structure, and the volumes, then dress the view instead of redesigning it.
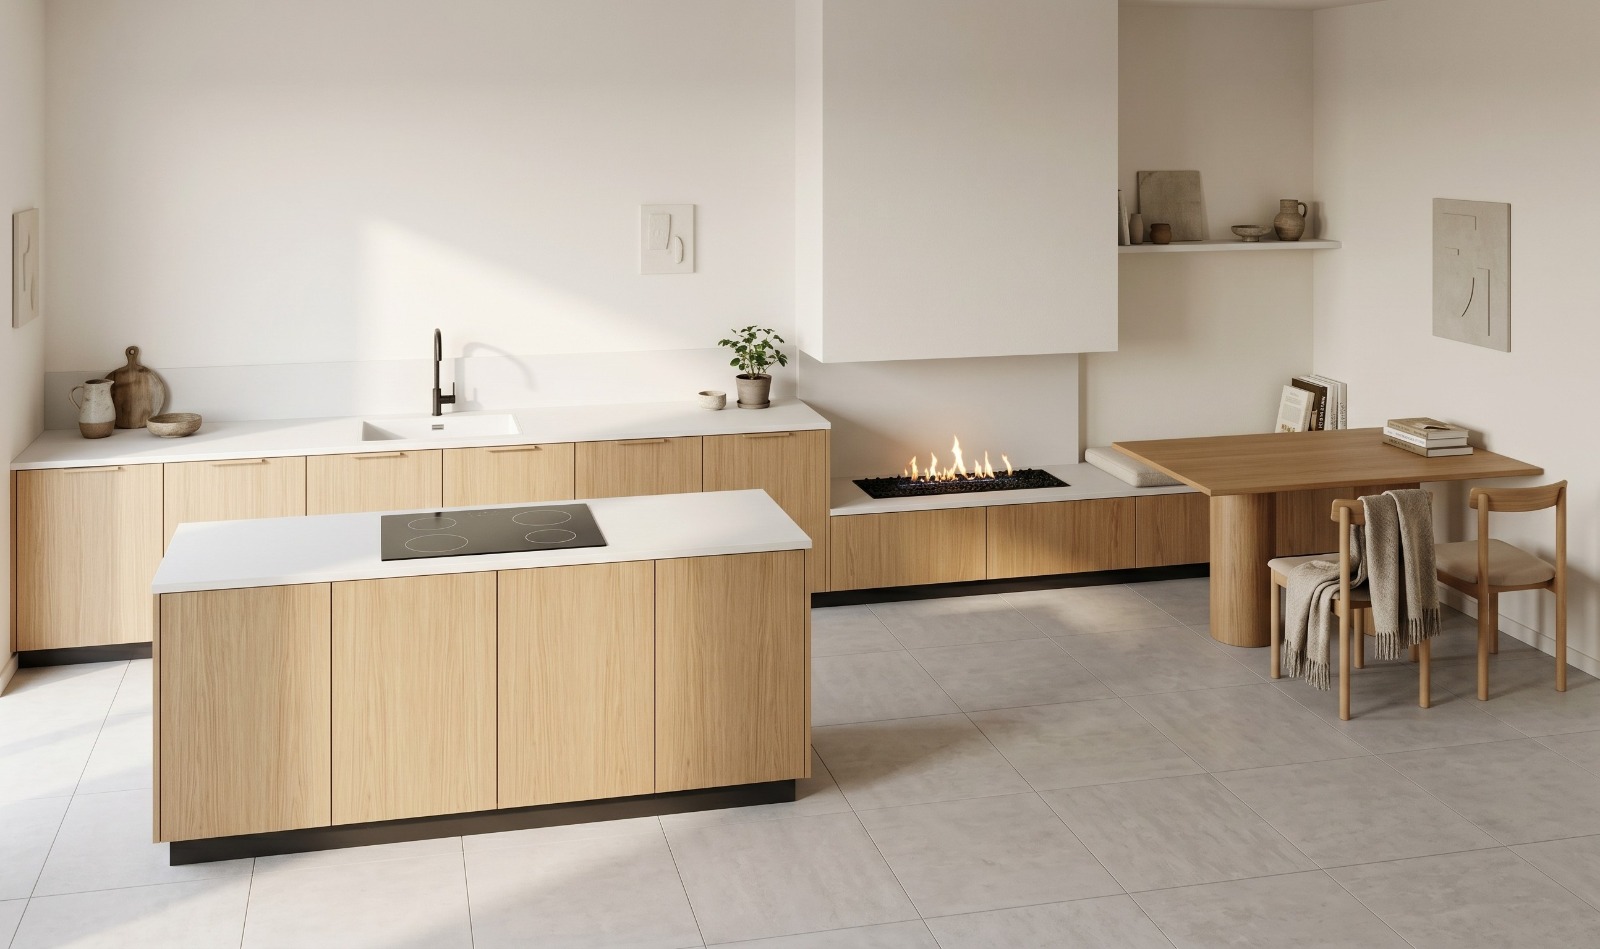
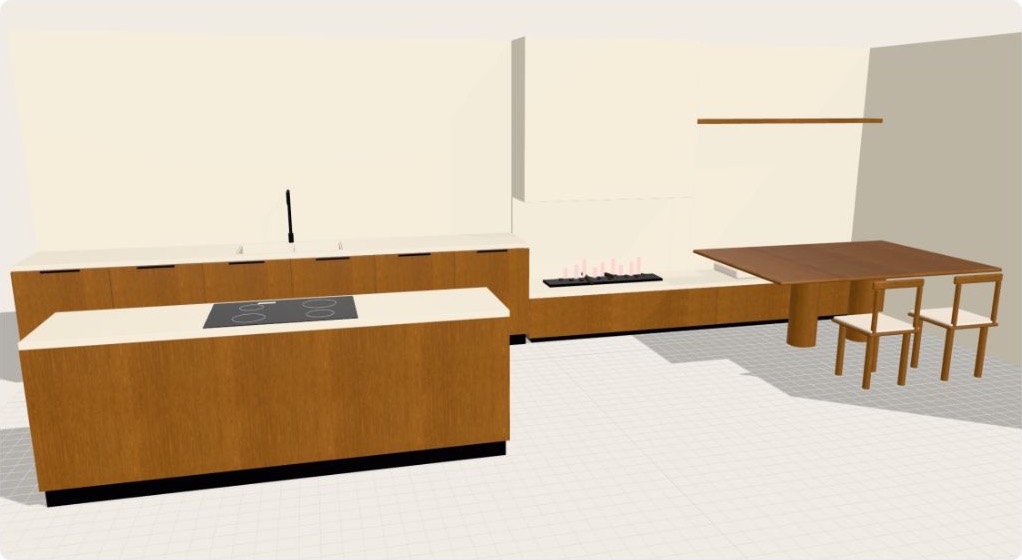
From 3D view to ChatGPT Images render.
Drag the divider to compare the working 3D screenshot with the rendered presentation image.
That screenshot carries the important information: the camera angle, the island size, the wall units, the height of the cabinets, the fireplace wall, the dining table, and the distance between objects.
With text alone, AI image tools wander. They add cabinets you never drew. They change the table base. They invent a sink or a tap. When I give them a 3D view to follow, they behave much more like renderers. They make the image photorealistic, while staying closer to the design.
The full loop
This is the full loop: I test the layout in AutoCAD, build the pieces in Prompt2CAD, place them in SketchUp, take the view I want, then use an AI renderer to dress that view. That is the part I would show a client early on. Not as a final render, not as construction information, but as a clear image of the actual idea.
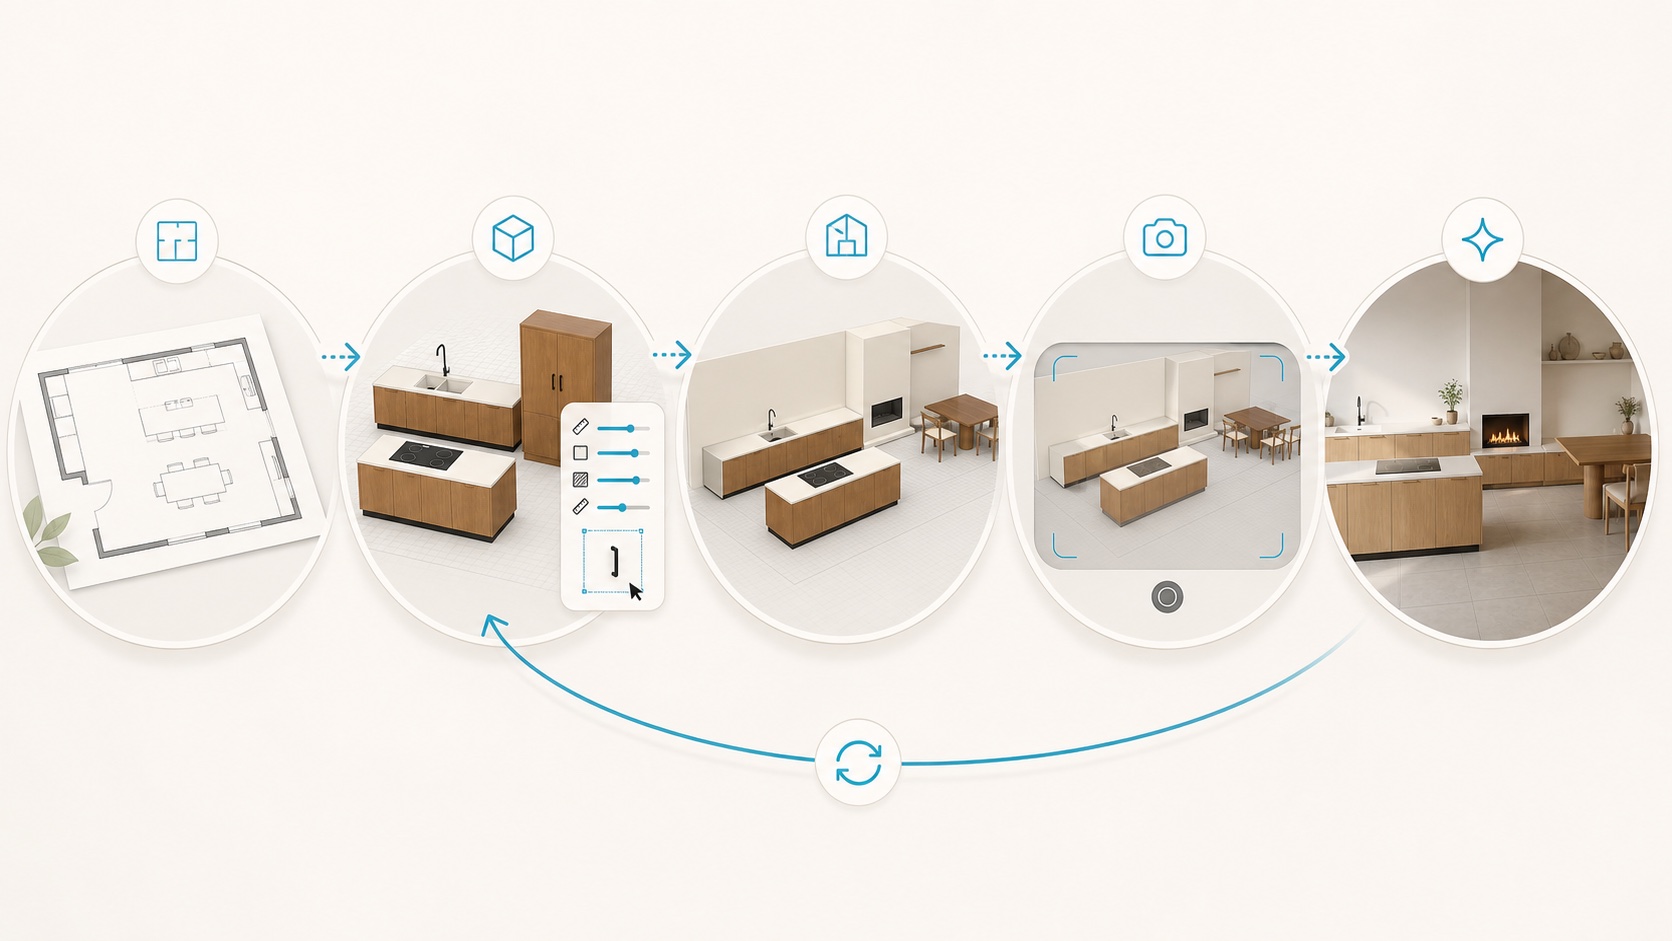
And when the client wants a change? This is where it really matters. I do not try to fix the final image with twenty prompt variations. I go back to the model, make the change in the geometry, take a fresh screenshot, and send that back into the renderer. I change the model first, then make a new image from that updated view.
If one thing sticks with you from all this, let it be that: AI renderers work better when they are given a 3D view to respect. Change the design first. Render the updated view after.
Where it still falls short
- There are more tools to manage. AutoCAD, Prompt2CAD, SketchUp, and an AI image tool each do a different job. That is powerful, but it also means you have to move between them. I think this will get smoother as AI workflows become more stable and the tools mature.
- Small details still need checking. Sometimes a part needs a nudge, or a join is not quite right. Usually I ask Prompt2CAD for the adjustment first. If a tiny clean-up is still needed, I can give it a final nudge in SketchUp.
A few things I've learned
- Build in pieces. Do not ask for the whole kitchen at once. Start with the main run, then the island, then the hood, then the handles.
- Give the constraint. Rough dimensions plus a clear requirement like "the boiler goes inside" are better than a long paragraph about every normal cabinet detail.
- Use numbers. "Small kitchen" is vague. "3.4 m wall, 90 cm drawer bank, sink under the window" is useful.
- Click first, then talk. Select the exact part before you describe the change.
- Render from screenshots. ChatGPT Images and Nano Banana are much more useful when they start from a 3D view.
What it gives me
I will keep using this workflow because it helps me express ideas more fully.
It does not replace AutoCAD. It does not replace SketchUp. It does not replace judgement. It helps me move from "I can see it in my head" to "I can see it in the room". Then I can have another idea, test that, compare it, change it, and keep going.
That is enough for me. A tool does not have to do everything to be useful. It just has to help the imagination become something you can work with.
If you work in interiors too, I would be happy to hear how you are using AI in your process. You can email me.
Federica